Tasks Module
Module Overview
After you have your first Project, the next thing to do is begin creating the Tasks. This is where the real features of Web2project begin to come into play. The simplest and most direct route is to simply create all the tasks with start and end dates and be done with it. Alternatively, dependency can be meticulously planned, late task notifications activated, dynamic tasks used extensively for rollup reporting, and task logs used for time tracking to turn Web2project into a centralized project management and collaboration hub. Depending on the needs of your organization, you can choose either of these alternatives or anywhere in between to fit your needs.
Task are used to define the Project’s scope and represents the designers actual workflow. You may have 1 project with multiple tasks representing the projects details. The Task module helps you track and maintain your time and cost.
Creating Tasks

On any Project or Task screen, clicking the “new task” button will bring a user to the New Task screen. There are five main aspects of every task:
- Overview – This consists of the priority, percent complete, status, and milestone. The implications of these options are covered below. This overview is available regardless of which task is displayed.
- Details – The Details tab allows a user to describe the task, assign the owner, choose its parent task, and even categorize it into a relevant work classification via a Task Type. For simple task tracking, the only important information here is the Description as it will give the assigned individuals an overview of the required work. For more advanced task tracking, choosing a parent task becomes important for task display and for Dynamic (roll-up) Task calculations. The Target Budget is another field used predominantly for information purposes only, it is not used in any calculations or projections.
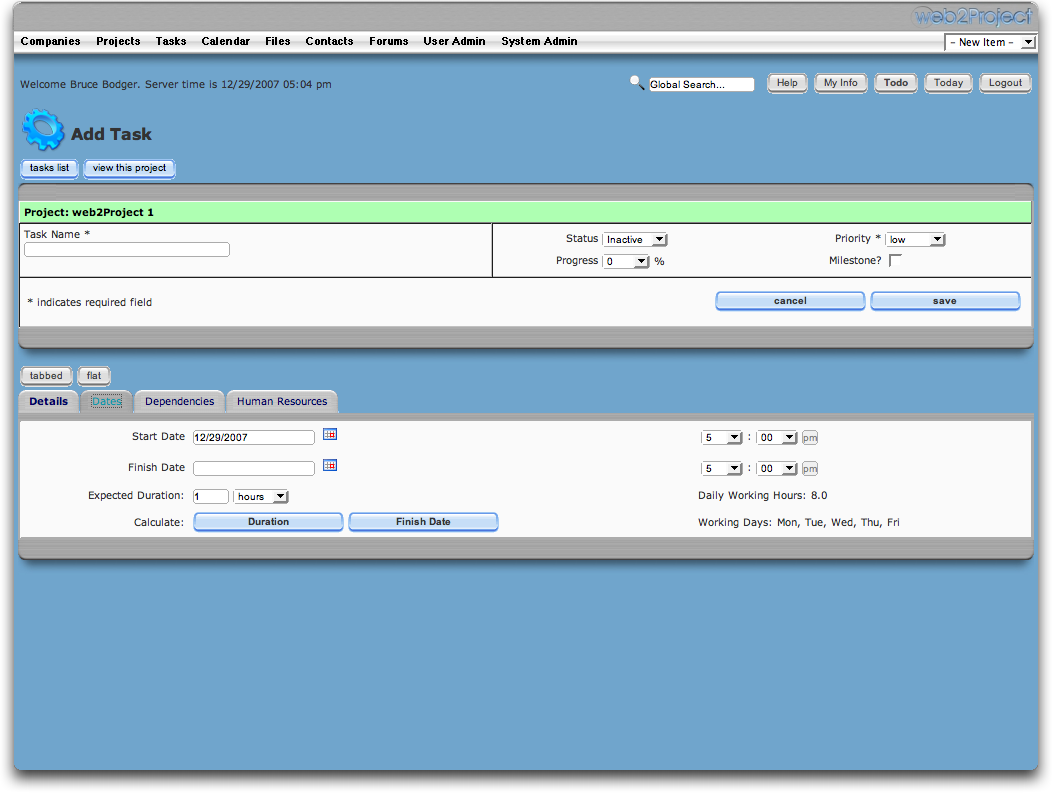
- Dates – The Dates tab allows a user can specify the start, end, and duration of a specific task. Once this information is set, the task will appear on the Calendar where appropriate. For either simple or advanced project management, this screen is used effectively the same. The only difference is that for Dynamic (Roll-up) Tasks, these dates and duration will be adjusted as child tasks are created.
- Dependencies – The Dependencies tab is where many of the advanced project management features begin to become available. For simple task tracking/Todo management, the Dependency tab can be ignored but the options available here are central for all advanced project management. The first option available activates Dependency Tracking. This will ensure that the start date for this task shifts accordingly as early predecessor tasks shift or projects are delayed. To choose these predecessor tasks, a user simply selects the relevant tasks from the left box, pushes the “>” button. This will copy the task to the right box. This list can have tasks added or removed at any time.
The “Set task start date based on dependency” does exactly what it describes. It takes all of the dependencies selected and finds the latest of all End Dates to determine the earliest Start Date for this new task. Finally, there is an option to create Dynamic (Roll-up) Tasks which are used to represent groups of tasks. By choosing this option, any start date, end date, or duration information attached to this task will be calculated from all the tasks beneath it.
![]() One of the new system settings available allows for Dependency Tracking to be turned on once globally for all Tasks. It can be deactivated on individual Tasks as needed.
One of the new system settings available allows for Dependency Tracking to be turned on once globally for all Tasks. It can be deactivated on individual Tasks as needed.
The options available on the Dependencies tab create four types of tasks which are denoted distinctly throughout the system. Some of these automatically handle quite a few things for you while some do not. All of these tasks appear on the Calendar and on individual assignees Todo lists.

- First, there are basic tasks. These have fixed start and end dates, have fixed durations, and are updated by the assignees as time goes on. No information – other than percent complete – will change about these tasks without a user making the specific change by hand.
- Next, there are dependency-driven tasks. Although the duration of these are fixed, their start and end dates are driven entirely by the predecessors. Therefore, if you have Task D which is dependent on Tasks A, B, and C being complete, the dates for Task D will shift as the dates for A, B, and C shift without a user editing D themselves. Since many screens are sorted by date – such as users’ Todo lists, Calendars, and the various Task lists – dependency-driven tasks will to shift around as necessary.
- Next, there are dynamic or rollup tasks. Each of these tasks represent all of their child tasks in a single line with a simple “summary” of the lower-level data. This summary consists of the sum of all durations, the earliest start date, and the latest end date. Therefore, as various child tasks are edited or shift based on dependencies, these dynamic tasks will shift accordingly. The benefit of these tasks are that instead of having to monitor or report on each of the individual tasks, this higher level task can be used. The more detailed tasks are still available for review if necessary.
- Finally, there are milestones. Most organizations tend to associate milestones with special events such as delivery dates, launch dates, or specific meetings. Therefore, a milestone is normally associated a task that is simply complete or not complete and not tracked to the same detail as other tasks. Web2project by default will set the duration of milestones to zero hours.
Human Resources – The final aspect of creating a task is assigning it to the individuals who will be performing the work.
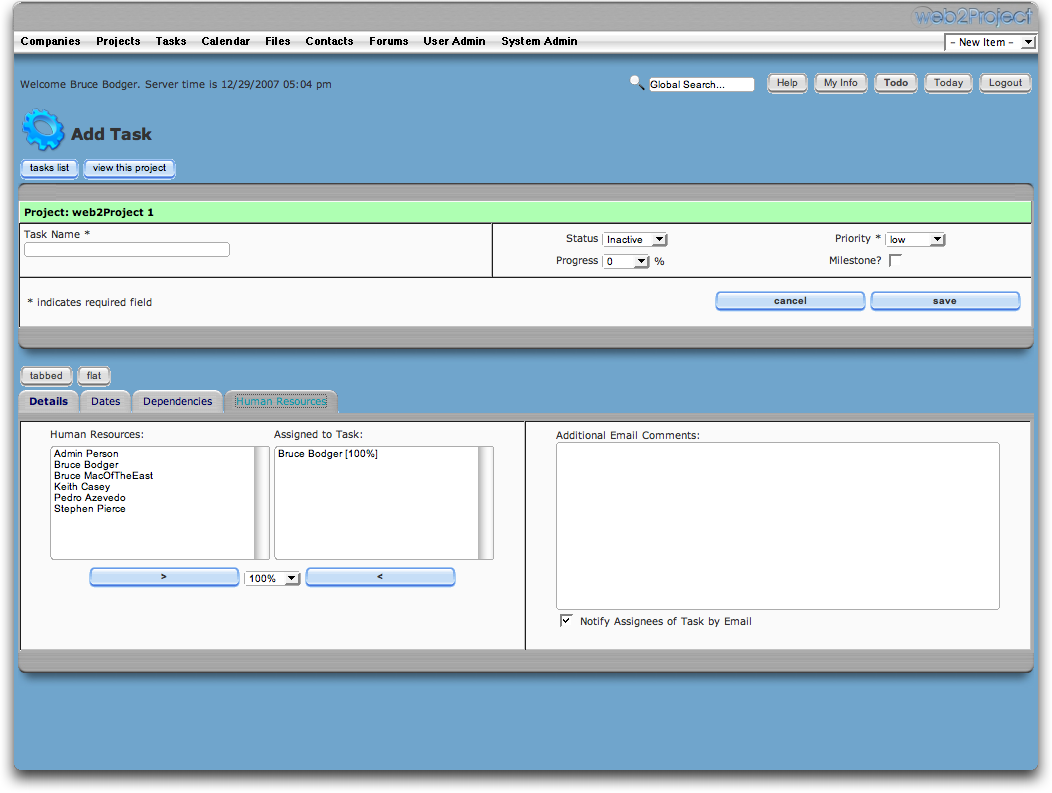
![]() One of the open questions within project management circles and within Web2project itself is “What does it mean when a user is 50% assigned to a task?” This could mean either that the person should perform 50% of the work or that the person should spend 50% of their time on the task. This question can have a major impact on scheduling, timelines, etc. Therefore, Web2project makes no distinction either way and leaves it up to the user to decide which practice to follow. This question will be answered in order to implement the Resource Management aspects of Web2project v3.
One of the open questions within project management circles and within Web2project itself is “What does it mean when a user is 50% assigned to a task?” This could mean either that the person should perform 50% of the work or that the person should spend 50% of their time on the task. This question can have a major impact on scheduling, timelines, etc. Therefore, Web2project makes no distinction either way and leaves it up to the user to decide which practice to follow. This question will be answered in order to implement the Resource Management aspects of Web2project v3.
When you are done filling in any of this information, all of the assigned people – other than the task creator – will immediately receive an email sharing this information along with a direct link to this task. This is to ensure that proper information is immediately available to the relevant individuals.
Email Notifications
There are three types of email notifications based on Web2project Tasks. The first type is the notification sent when a task is created or edited. This notification contains the task description, the due date, and a link back to the task screen. By default, this notification is sent to all task assignees other than the task creator. System administrators can choose to automatically notify the creator.
The second type of notification comes when the assignees log time against a task. These notifications go immediately to the task creator and include the entire task log the user entered. Alternatively, when there are multiple assignees to a single task, the assignee can choose to send this update to the other assignees. When collaboration and cooperation is necessary on a task, this is a simple way for multiple people to coordinate and share information quickly without requiring the other team members to log in.
Finally, the third type of notification is for late tasks. This causes Web2project to create a simple reminder email for each late task every day for 100 days. This can only be turned on via the system admin and is activated globally for all users on all tasks. Since this notification is not triggered by a user’s action, the queuescanner script must be enabled. For further information, please see the section entitled Maintenance Tasks.
Tasks List View (Tasks index page)

The Task List page is located when you click on the Task Menu. There are a number of filters you can set to change what you’re viewing.
| Filter | Description |
|---|---|
| User | View the tasks specific to a single user |
| Company | View tasks specific to a single company |
| Task Filter | View the tasks according to your unfinished tasks, your projects, and more |
On the left of the page are buttons you can use to further filter your results.
- My todo
- My Pinned Task
- Show Inactive Task
- Task Per User
At the center of the stage is a table with columns.
| Field | Description |
|---|---|
| Pin | Mark as Yours |
| Log | Create a Task Log |
| Task Name | Click to View Details |
| Task Creator | Who Owns |
| Assigned Users | Who is Assigned |
| Start Date | When it was started |
| Duration | How long it will last |
| Finish Date | When its going to be done |
| Last Updated | When it was last updated |
Also note that each task is color coded to help you identify when a task:
- Is a future task
- If it has been started on time
- If it should have started
- If it is overdue
- If it is done.
Tasks View Screen (Task View Page)
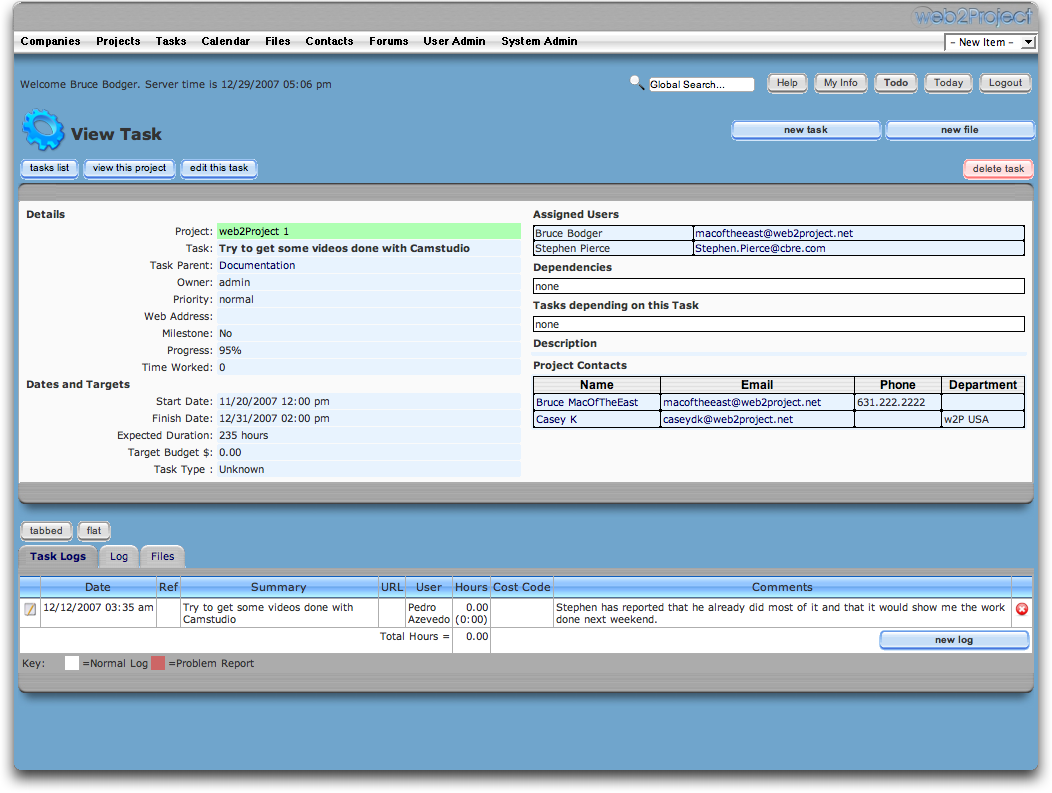
When you click on a task name it will take you to the view task page where you can view comprehensive information about the task.
The main view page consist of eight (8) main categories.
Details Dates & Targets Assigned Users Dependencies Task Depending on this Task Description Contacts for this Task Contacts for the Project.
Details
| Field | Description |
|---|---|
| Project | Name of the project this task belongs to |
| Task | The name of the current task your viewing |
| Owner | The owner of the task |
| Priority | Either LOW, NORMAL, HIGH |
| Web Address | If the project has a URL |
| Milestone | Is this task a milestone of an array? Yes or NO |
| Progress | Lets you see how far along the project is in % |
| Time Worked | Based of the total time recorded from task logs |
Dates & Targets
| Field | Description |
|---|---|
| Start Date | Displays the date and time task started |
| Finish Date | Displays the dynamic end date |
| Expected Duration | Calculated by the dates and time combined together |
| Target Budget | Each task can have a target budget which should be consistent with the project overall budget |
| Task Type | Displays the task type |
Under the main window are a set of tabs.
| Field | Description |
|---|---|
| Task Logs | Displays the logs details, summary of hours, cost code used and comments |
| Log | Allows you to enter a new task log for this task |
| Files | Allows you to work with files associated to this task (See Files Module for more information) |
| Links | View links associated with this task (see Links Module for more information) |
| Resources | Displays the extra resources for this task ( View the Resources Module for more information) |
Gantt Charts
The Gantt Chart is the center of nearly every project management system and no system could be considered complete without it. As you create tasks and dependencies, the system itself will handle the display and reordering to create the traditional waterfall pattern. To view the Gantt Chart, on any active project, click the Gantt Chart tab.
There are four key aspects to all Gantt Charts within Web2project:
- Tasks – A task on the chart will always appear as a bar shaded according to the task status. If the task is in progress – but not complete – it will appear in blue. As work is performed on this task and the percent complete is updated, a black bar will overlay the bar covering more and more of it. Finally, once the task is complete, the bar turns completely grey.
- Dynamic Tasks – A dynamic task represents a series of other tasks as a rollup and does not have a duration itself. In order to represent this clearly, these tasks become a bar with a carat at each end and tasks below.
- Dependencies – Dependencies are represented by arrows connecting tasks from one to another. Due to the day-based display of the chart, a task which ends on the same day that a future task begins may display an arrow going backwards. This is not necessarily an error.
- Milestones – A milestone – regardless of its duration is designated with a black diamond on a single date.
Task Logs / Reporting
Whenever a User wishes to log time against the task, they can view the Task and click “New Log” or they can click “Log” from the Todo List screen. Either route gives a simple interface for the user to update the progress, the hours worked, to select a costcode, and attach a comment. Web2project requires a comment of some type to be logged, but there are no requirements in terms of the number of characters or form of the comment. The primary options available here are the email notifications. These three options determine who gets the status update. By default, only the Task Owner is notified but by selecting “Task Assignees”, “Task Contacts”, or “Project Contacts”, the respective group can be notified immediately upon update.
Once the log is saved, these comments become a part of the ongoing project log, appear in many of the reports throughout the system, and are immediately sent to the Task Owner and group(s) selected. In addition, the percent complete of any parent tasks and of the overall project will change to reflect the new information. Therefore, anyone else viewing the project can immediately see the updated information and have a complete view of the project.
For organizations which require extensive reporting or accountability – especially common in legal, governmental, or medical areas, this model becomes useful for tracking projects closely and even on a daily basis. For others, this may be unnecessary noise and can be distracting. Therefore, the default for this notification can be set by the System Administrator and adjusted on a per-task update basis by the individual user.
Todo List
The most commonly used interface in the entire system is the “Todo List”. The default installation has this as all users’ first screen after Login. The columns represent the Task name, the color-coded Project name, and finally the color-coded date information. The color-coded date information is by far the most important aspect and represents the status of the Task itself. The four colors represent “Future Tasks” (white), “Started and on time” (green), “Should have started” (peach), and “Overdue” (red). This is an efficient way to monitor all your assigned open tasks and review deadlines across all Tasking. With the proper permissions, you can also choose to view other users’ lists.
Costcode Management
Costcodes – called Billing Codes, Project Codes, etc by some organizations – are a simple method of allowing different users to track their time against specific types of tasks on individual task log entries. Some of this information can be used to track the type of work performed – such as administrative work versus development work – or even between different developers with differing billing rates. The Billing-code Management in the System Admin section goes into greater detail on configuring this information for your users.
![]() There has been quite a bit of discussion and development towards supporting detailed budget tracking and concepts such as Earned Value Management within Web2project. Although none of these efforts are currently available to the general public, consistent usage of Costcodes are vital to tracking the relevant information.
There has been quite a bit of discussion and development towards supporting detailed budget tracking and concepts such as Earned Value Management within Web2project. Although none of these efforts are currently available to the general public, consistent usage of Costcodes are vital to tracking the relevant information.